Beef Bulgogi Spring Rolls
This beef bulgogi spring rolls recipe is fast and easy, as I used supermarket marinated beef bulgogi as a shortcut. I saw a good offer for Angus beef bulgogi beef at Don Don Donki and I bought two trays to make these Vietnamese fresh spring rolls (aka ‘summer rolls’), followed by Korean beef bulgogi kimbap. To make beef bulgogi spring rolls, I cook the beef in a pan, prepare assorted veggie fillings and wrap the spring rolls. The first two steps can be prepared the night before (as I did) to save time the next day. I also replaced the usual rice vermicelli in fresh spring rolls with shredded white cabbage for a lower-carb version. This recipe featured two ways of wrapping the fresh spring rolls. If you tried this recipe, you can head over to my beef bulgogi kimbap recipe to use up any leftovers the next day, and vice versa.
See Also:
- Beef Bulgogi Kimbap
- Vietnamese Summer Rolls
- More Japanese Recipes
- More Korean Recipes
- Izakaya at Home Recipes
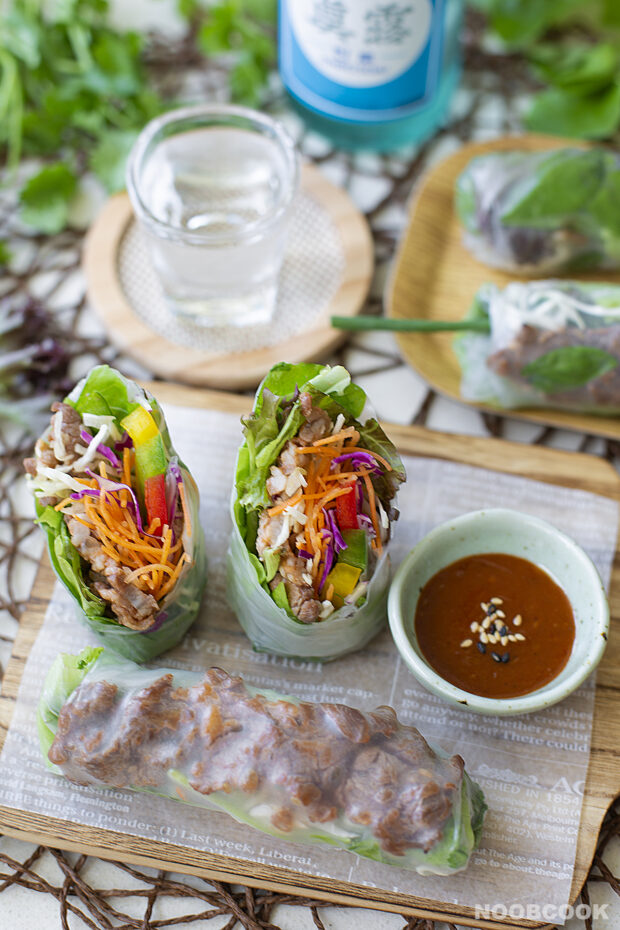
Of course, these beef bulgogi spring rolls were specially made for my home izakaya. I enjoyed them with Korean soju on the rocks :)
INGREDIENTS
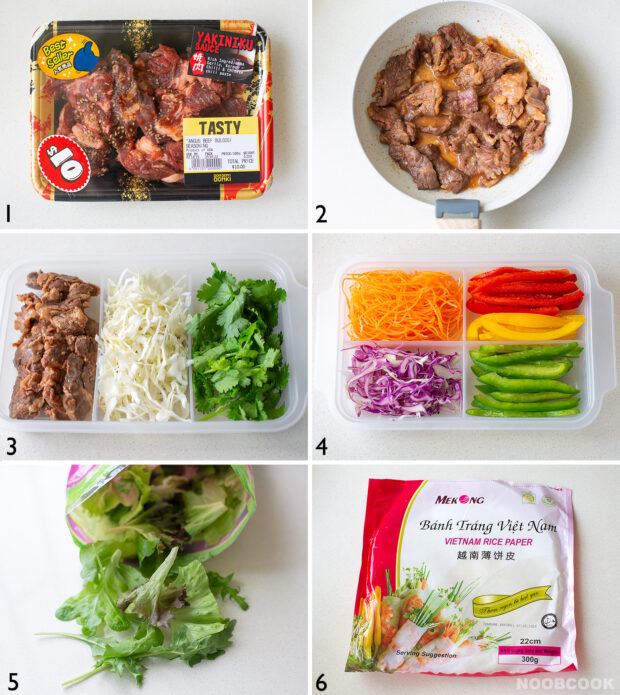
These are the main ingredients for my beef bulgogi spring rolls.
(1) & (2): supermarket marinated beef bulgogi. Fry the beef in a pan with a bit of oil. Remember not to overcook the beef.
(3) – cooked beef, shredded cabbage (low carb replacement for rice vermicelli) and lots of fresh coriander (and a few basil & mint leaves).
(4) – shredded carrot & red cabbage, and tri-colour bell peppers.
(5): ready-to-use salad mix pack (pictured) or lettuce (romaine or coral lettuce).
(6) Vietnamese rice papers: I am using 22 cm (8.6 inch) sized rice papers.
MAKE THE DIPPING SAUCE
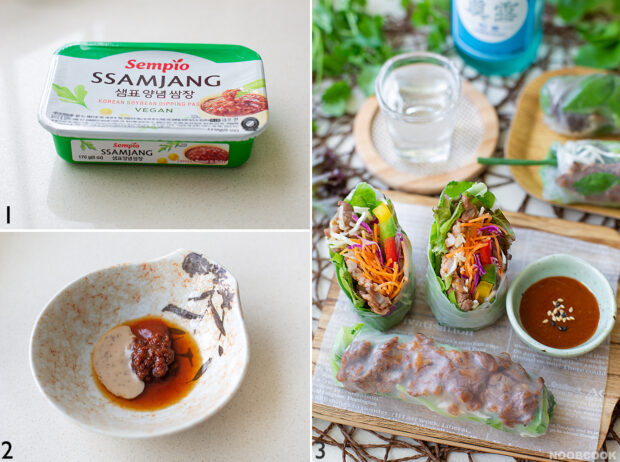
I used store-bought ssamyang dipping sauce as the base sauce. I mix it with other sauces in my fridge so that it become a smooth paste – a bit of ponzu sauce + Japanese sesame goma salad dressing and sriracha chilli sauce (for extra heat). Serve with roasted sesame seeds.
HOW TO WRAP THE SPRING ROLLS (STEP-BY-STEP PHOTOS)
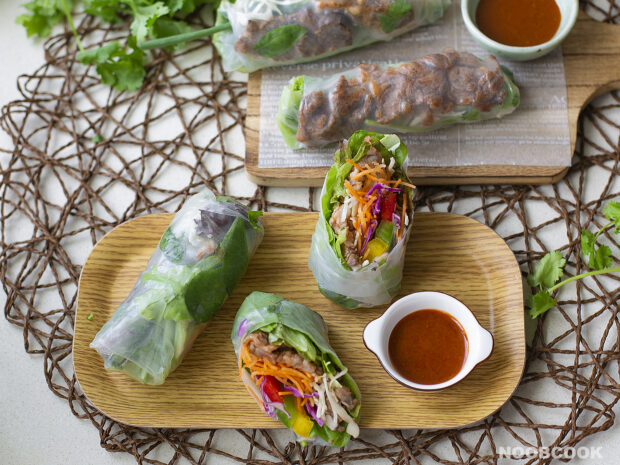
I tried two types of wrapping for my fresh spring rolls. The first visual is the basic roll (pictured above, bottom plate), and the second visual is the spring roll where the main protein (beef) is shown on the top face of the spring roll. Before wrapping, soak each piece of rice paper in slightly warmed water for a few seconds, or until the rice paper starts to soften. Place the softened rice paper on a large plate or a wooden board and start wrapping.
Note: My workmanship is not very good due to my inexperience, hope you don’t mind seeing my imperfect step-by-steps photos.
(A) Basic Roll
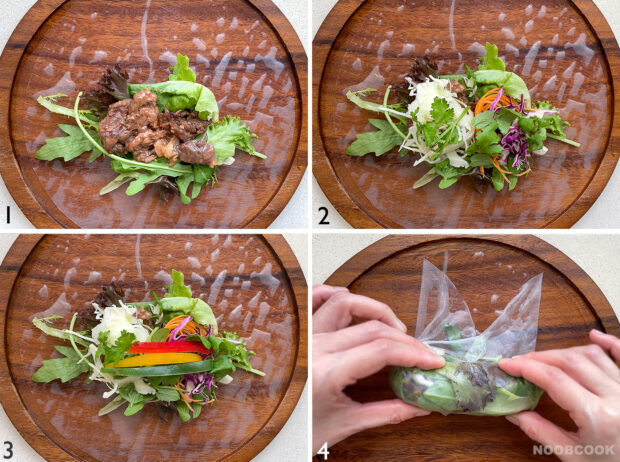
Arrange the salad mix (or lettuce) followed by the rest of the ingredients in the middle of the rice paper. Fold in the left and right sides of the rice paper, followed by the bottom side. Roll the wrap away from you, while keeping the fillings tight.
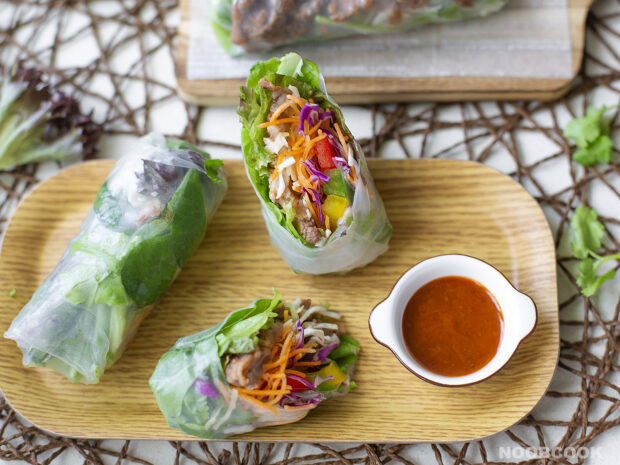
This is the final look of the basic roll:
(B) “Aesthetic” Roll – aka Top of Spring Roll Showing the Main Protein (Beef)

Arrange the ingredients on the rice paper as shown in photo (2). The top beef layer will the top ‘face’ of the spring roll. Fold in the left and right sides of the rice paper, followed by the bottom side. Roll the wrap away from you, while keeping the fillings tight. When you reach the base of the beef, insert a decorative chive or spring onion & protrude it out a little (optional). Continue rolling the last portion of the spring roll. Flip the spring roll over to reveal the aesthetic side showing the beef.
This is the final look if the “aesthetic” roll:
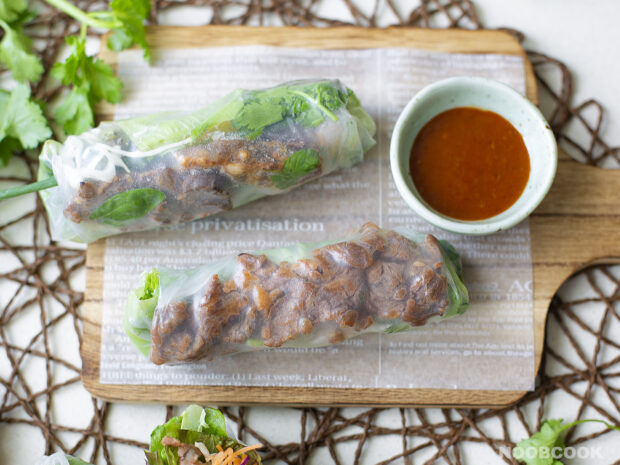
Whichever method you choose to wrap your spring roll (why not try both?), they are fun to make and pretty to look at! Serve the spring rolls with dipping sauce at the side.

Beef Bulgogi Spring Rolls Recipe
Estimate by eye the amount of each ingredient you need for each spring roll. Do not stuff the rice paper with too much ingredients, otherwise they may burst. Remember to keep the fillings tight as you wrap and roll the spring roll.
I replaced the usual rice vermicelli in Vietnamese spring rolls with shredded white cabbage for a lower carb version. Feel free to switch it back to cooked rice vermicelli if you want a more filling meal.
Check out the more tips, ingredients photos and step-by-step photos on the previous page.
Ingredients:
- 6 pieces of 22-cm (8.6-inch) Vietnamese rice papers
- 200g supermarket beef bulgogi (or make your own)
- 50g shredded white cabbage
- 20g shredded red (purple) cabbage
- 20g coriander (and a few mint or basil leaves)
- half carrot thinly shredded or cut to matchsticks
- 75g salad mix (or lettuce such as romaine or coral)
- half bell pepper (capsicum) cut to strips; use tri-colour for best look
- 6 long section of chives or spring onions (scallions) optional
(A) Dipping Sauce
- 4 tsp instant ssamjang sauce (or make your own)
- 1 tsp sriracha chilli sauce for extra heat; to taste
- 2 tsp ponzu sauce
- 1 1/2 tbsp goma (sesame) salad dressing
You also need:
- a large plate of water (for dipping the rice papers) for best reasons, use slightly warm water
- a large plate or wooden board for wrapping the rice rolls
Directions:
- Cook beef bulgogi in a pan with a bit of oil, taking care not to overcook the beef. Divide into 6 portions. Set aside.
- Prepare the rest of the ingredients. Also prepare a deep plate or bowl of water for dipping the rice paper rolls.
- Make the dipping sauce by combining (A) in a small bowl, stirring until smooth. Season to taste. Portion them out into 2 small saucers sprinkled with roasted sesame seeds.
- Make the spring rolls. Quickly dip a piece of rice paper in water until the entire surface is wet and just start to soften, about 7-10 seconds. Place softened rice paper on a large plate or wooden board. Wrap the spring rolls in either one of the following two styles. #1 Basic Roll (Click here for the step-by-step photos). Arrange the salad mix (or lettuce) followed by the rest of the ingredients (minus the chives) in the middle of the rice paper. Fold in the left and right sides of the rice paper, followed by the bottom side. Roll the wrap away from you, while keeping the fillings tight. OR #2 Aesthetic Roll (Click here for the step-by-step photos). Arrange the ingredients as shown in this photo. The topmost beef layer will the the front “face” of the spring roll. Fold in the left and right sides of the rice paper, followed by the bottom edge upwards. Roll the wrap away from you, while keeping the fillings tight. When you reach the base of the beef, insert a decorative chive or spring onion & protrude it out from the spring roll, then continue rolling the last portion of the wrap. Flip the spring roll over to reveal the aesthetic side showing the beef.
- Serve the spring rolls with the dipping sauce. If you are not eating them immediately, wrap the plate of spring rolls with cling wrap. Leftovers can be kept in the fridge in an air-tight food container for 2 days by wrapping each spring roll in cling wrap.